
How to Choose a Sheet Cutting Strategy
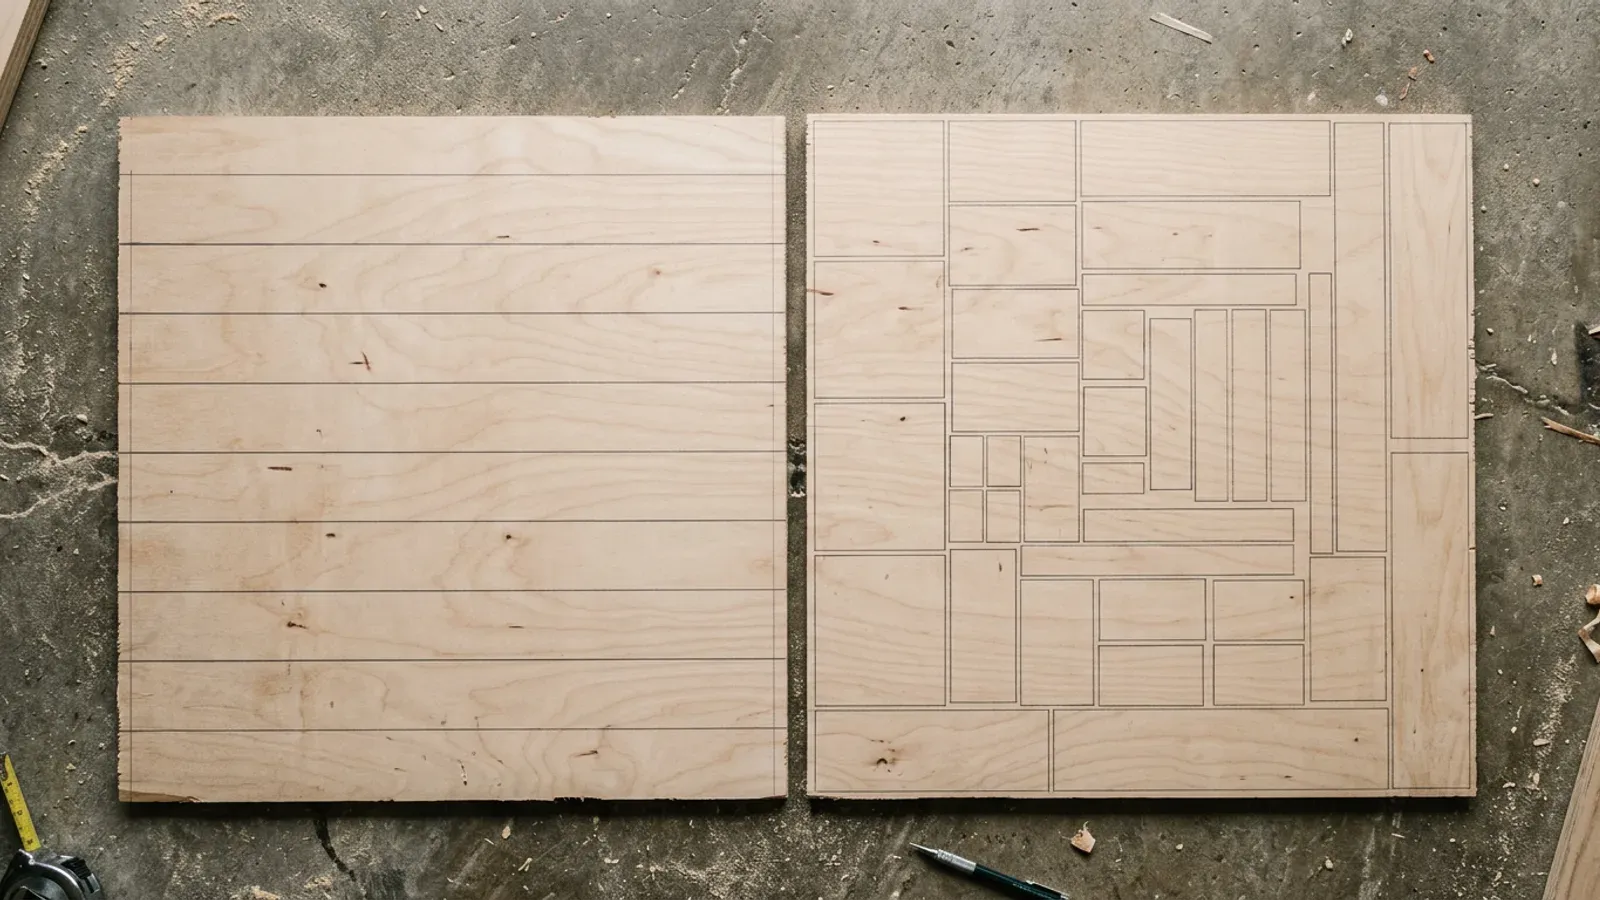
Two shops can run the same cut list and lay it out completely differently, and both can be right. One rips clean strips across the board because that is what a panel saw does well. The other packs parts in tight to squeeze every part from the sheet. The layout that saves the most board is not always the layout you want at the saw, and knowing which you are choosing is half the job.
What is a sheet cutting strategy?
A sheet cutting strategy is the rule for how parts are arranged on a board, and there are two honest choices: rip-first for clean strip cuts, or tightest-packing for maximum yield. Rip-first lays the job out in full-width strips you can rip straight across the sheet, which suits a table or panel saw and keeps every cut simple. Tightest-packing fits parts wherever they go to leave the least waste, which saves board but asks more of your cuts and your setup.
Neither is the “best” strategy in the abstract, because they optimise for different things. Rip-first optimises for easy, repeatable cuts. Tightest-packing optimises for fewer sheets bought. The right one depends on how you cut, not on which sounds cleverer, so a strategy you choose on purpose beats one a tool forces on you.
Should you rip clean strips or pack for tightest yield?
Choose rip-first when clean, simple cuts matter more than the last sheet of yield, and choose tightest-packing when material cost is the thing you are protecting. A one or two person shop on a panel saw usually wants rip-first: the cuts are quick, square, and hard to get wrong, and the small extra waste is worth the speed and accuracy. It is the safer default when the saw, not the sheet, is your bottleneck.
Reach for tightest-packing when board is expensive or the run is long enough that a saved sheet per job adds up. Birch ply is dear, and on a big kitchen the tighter layout can genuinely save a whole sheet, which pays for the fiddlier cuts. The trade is real: more cuts, more careful setups, and offcuts in more awkward shapes. Pick it deliberately, not because “tightest” sounds like the right answer.
How does Cutzilla handle the two strategies?
Cutzilla gives you both strategies and lets you pick the one that matches how you cut, then does one thing automatically that is easy to get wrong by hand: it lays the job out both ways round, vertical and horizontal, and keeps whichever orientation wastes less board. In Cutzilla the rip-first strategy is called CODA and the tightest-yield one is LEDGE, and you choose between them rather than having a layout imposed on you.
That automatic orientation check is the genuine time-saver. A lot of cutting software leaves cut direction as a manual setting you have to guess at, and defaults to running parts length-first whether or not that is the better fit. Cutzilla tries each layout both ways within your chosen strategy and keeps the better result, so you are not re-running the job to see if the other orientation was tighter. You can see how the two strategies differ on the algorithms page.
Can you just let the software pick the best layout?
You can compare layouts, but “tightest” is not automatically “best” for your shop, so the choice of strategy stays yours. Cutzilla can run both strategies and every orientation and hand you the least-waste result, and that result is almost always the tightest-packing one. If you cut clean strips on a panel saw, that is not the layout you want, however little board it wastes, because it asks for cuts your setup is not built for.
So treat the software as a way to see your options clearly, not as an oracle that knows your saw. Pick the strategy that fits your bench, and let Cutzilla do the fiddly orientation comparison inside it. If you want to see how its approach lines up against other tools, the comparison lays it out, and you can try both strategies on the free sheet cutting calculator.
Try it free. Cutzilla runs both cutting strategies in the browser and keeps the lower-waste orientation for you, with no install on any device. Start free.